|
Welcome to a VIA Online Learning Tutorial: This site has been developed to provide learning materials to enable you to create X-ray exposure charts.
Select Chapter:
1. INTRODUCTION
2. STARTING [print this page]
3. CREATING

The mAs-variable method of determining exposures is used with X-ray machines that have linked settings for kVp and mA. This is most common on low-output portable X-ray machines with conventional generators.
Getting started
You will need to make three test exposures of the mid-part of the dog featured in the check list featured here. The objective is that each radiograph should contain an image of the caudal thorax, cranial abdomen and thoraco-lumbar spine (Figure 1), allowing you to assess the quality of the radiographic detail rendered by thoracic, abdominal and deep bone tissue on the same film.
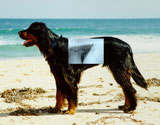
Figure 1: Area of test radiographs [click to enlarge]
Measuring
The dog should be anaesthetised and the grid properly positioned. To accurately measure the part to be radiographed, place the dog in lateral recumbency and measure its thickness at the level of the 12th rib with the calipers. If the measurement is an intermediate value (such as 13.4cm) record the next highest whole number.
Initial kVp setting
To determine the kVp for the first of the three test exposures I have modified Sante's Rule and suggest that you calculate the kVp using the following formula.
(measured thickness in centimetres x 2) + 40 = initial kVp
For example, if your dog measures 14cm thickness at the 12th rib, the initial kVp should be 68. If your X-ray machine cannot generate the exact kVp required, select the nearest available setting to the one calculated. In the example above, if you could not select 68kVp because your settings were fixed at increments of 10kVp, you should select either 60kVp or 70kVp as your initial value (preferably the value linked to the higher mA).
Initial mAs setting
When using a 6:1 ratio grid, aim to set the machine to produce a mAs between 5 and 10. To calculate mAs values, multiply the mA value by the exposure time in seconds, as explained under mAs featured here. Select a time setting from the six or so values that fall within the required range. At 35mA — depending on the available time settings of individual X-ray machines — a mAs between 5 and 10 can be generated in, typically, four ways (Table 1).

Table 1: Typical mAs values available at 35mA
Test radiographs
Make the first exposure using the settings for kVp-mA and seconds calculated from the above steps. Then, keeping the kVp-mA setting constant, make two additional exposures, one using half, the other twice, the exposure time of the initial radiograph.
Processing
Process all three images simultaneously. If you process your films manually, make sure you are using fresh chemistry at 18-22°C. The optimal developing time is four minutes.
Evaluate
Examine the films after processing (Figure 2) to determine which if any contains an optimal image of the:
• thorax
• abdomen, or
• spine.
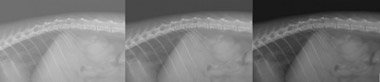
Figure 2: Test radiographs of selected area to include spine, thorax and abdomen
[click to enlarge]
If none of the films contains an optimal image of any of the three body parts, you will have to decide whether the radiographs are underexposed (too light) or overexposed (too dark).
Underexposure
To correct for underexposure, add 10 per cent to the kVp setting used for the first test exposure or double the exposure time used to produce this radiograph and use the new values to make the first of three new test exposures using the method described under Test radiographs. Evaluate each radiograph in this second series for optimal images of the three body parts.
You may have to repeat this process once more to finetune your exposures, but persevere until you produce one good image of each body part (Figure 3) — differences in radiopacity will prevent optimum images of the thorax, abdomen and spine occurring at the same exposure factors.
Overexposure
To correct for overexposure, subtract 10 per cent from the kVp setting used for the first test exposure or halve the exposure time used to produce this radiograph and use the new values to make the first of three new test exposures using the method described under Test radiographs. Evaluate each radiograph in this second series for optimal images of the three body parts.
You may have to repeat this process once more to finetune your exposures, but persevere until you produce one good image of each body part (Figure 3) — differences in radiopacity will prevent optimum images of the thorax, abdomen and spine occurring at the same exposure factors.
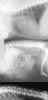
Figure 3: Successful radiographs selected as the basis for your technique charts [click to enlarge].
Record
After you decide which exposure contains the most successful radiographic image of each body part, record the relevant kVp, mA and exposure time in the appropriate place in Table 2. Your table should look like this:
Table 2 will become your reference chart, from which you will be able to calculate the settings for your mAs-variable chart.
Use Table 3 to record all the other details relating to these exposures.
Table 2: Reference Chart for mAs-variable Chart
Table 3: Successful Test Exposure Specifications
|

